Quick comparison for apparel buyers
Screen print, puff print and embroidery create different surfaces and impose different production constraints. The best method is the one that reproduces your artwork consistently on the selected fabric.
| Method | Usually suits | Main cost drivers | Approval focus |
|---|---|---|---|
| Screen printing | Large graphics, solid colors, repeat programs | Color count, screens, underbase, print area | Color, hand feel, opacity, curing |
| Puff printing | Bold shapes and raised graphic accents | Ink system, puff height, artwork coverage | Expansion, edge definition, wash result |
| Embroidery | Logos, badges, text and durable tactile branding | Stitch count, size, density, backing | Registration, puckering, reverse-side finish |
When screen printing is the practical choice
Screen printing is often efficient for repeated artwork and strong opaque color. It can use plastisol, water-based or other ink systems, but the selected system must suit the fabric, color, stretch and required hand feel.
- Provide vector artwork or high-resolution separations and identify every print color.
- Confirm whether dark garments need an underbase and how that changes hand feel.
- Approve print dimensions from garment reference points—not only from a digital mock-up.
- Test curing and laundering on the actual fabric, especially after garment washing.
What changes with puff printing
Puff ink expands during curing, so fine lines, tight counters and dense detail may close up. Artwork often needs simplification before production. Puff height can also vary with ink deposit, temperature and fabric surface.
How to specify embroidery
Embroidery quality depends on digitizing, stitch direction, density, thread, backing and garment stability. Heavy fleece may support dense embroidery better than lightweight jersey, while thin or stretchy fabric can pucker without the correct stabilizer.
- Finished width and height
- Thread color references
- Stitch type and direction
- Backing or stabilizer
- Placement tolerance
- Reverse-side comfort
Can you combine screen printing and embroidery on the same garment?
Yes. A print can carry the large color area while embroidery adds a logo, outline, badge or selected tactile detail. This can reduce unnecessary stitch coverage and create depth without turning the entire artwork into a dense embroidered panel.
Plan the two methods as one decoration system. The print and stitch layers need a shared placement map, a confirmed production sequence and one combined approval sample.
| Use screen print for | Use embroidery for | Control together |
|---|---|---|
| Large graphic areas, solid color and soft or opaque coverage | Focal logos, line accents, badges and raised texture | Relative position, overlap, color relationship and scale |
| Details that should remain flexible | Areas where added structure and thread texture are acceptable | Fabric distortion, garment weight and wearing comfort |
| Artwork that can be separated into print colors | Artwork that can be digitized into practical stitch paths | How both layers change after laundering or garment finishing |
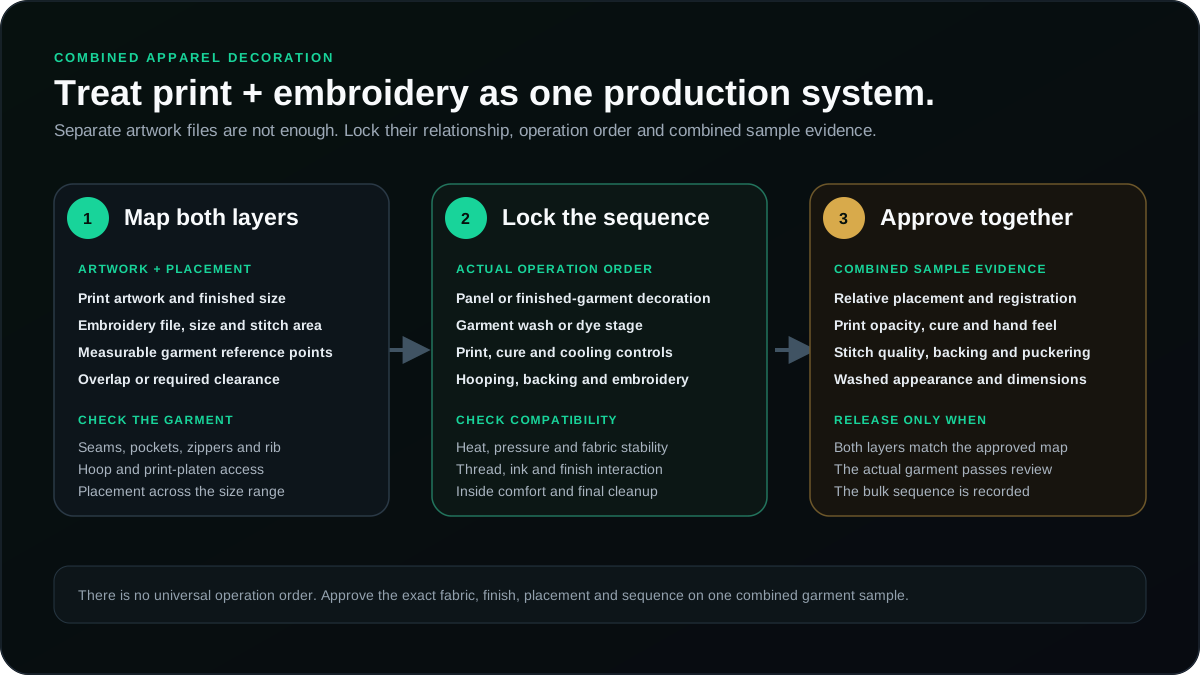
Plan the print and embroidery production sequence
On many finished-garment programs, printing and curing before embroidery can preserve a flatter surface for the print operation. That is a planning direction, not a universal rule. Overlapping artwork, panel decoration, appliqué, special inks and garment finishing may require another sequence.
| Production situation | Planning question | Approval evidence |
|---|---|---|
| Separate print and embroidery locations | Can the garment sit flat on the print platen and still be hooped without damaging the first decoration? | Actual sequence and placement on one finished sample |
| Embroidery touches or overlaps the print | Will needles, backing, heat or fabric movement change the printed layer or registration? | Combined strike-off or garment sample, not separate swatches |
| Garment wash or dye | Does decoration happen before or after finishing, and how do ink, thread and backing respond? | Washed sample with color, dimensions and surface reviewed |
| Decoration on cut panels | Can panels be printed or embroidered before sewing, and are construction references controlled? | Panel placement map plus assembled-garment check |
Record the sequence in the tech pack or production instruction. A quotation that lists two decoration methods but does not identify the operation order leaves a material production decision open.
Prevent placement, hooping and seam conflicts
A mockup can show the visual idea but cannot prove machine access. Screen printing needs a workable surface and platen position. Embroidery needs hoop access, stabilizer and room for the machine head. Pockets, zippers, hood seams, rib, side seams and thick seam intersections can restrict either process.
- Give separate finished dimensions for the print and embroidery.
- Measure both layers from named garment reference points.
- State whether the layers overlap, touch or need a clearance zone.
- Check placement on every garment size that changes available space.
- Identify seams, pockets, zippers and panels inside each decoration area.
- Approve the relationship between layers, not each position independently.
For a large graphic with a small embroidered accent, define the accent from the printed artwork and from a stable garment point. This gives production a way to verify alignment even when normal garment tolerances create small position changes.
Approve the combined decoration sample before bulk
Separate print and embroidery swatches can confirm color or technique, but they do not prove that the completed garment works. Review the actual fabric, garment color, finish and decoration sequence together.
- Print: color, opacity, registration, edge definition, cure and hand feel.
- Embroidery: digitizing, stitch direction, density, thread, backing and trimming.
- Alignment: relative position, intended overlap and placement tolerance.
- Fabric: puckering, stretching, stiffness and distortion around both areas.
- Inside finish: backing, thread ends, comfort and interaction with labels or seams.
- After washing: dimensions, print surface, thread appearance, puckering and shade.
Information to send for an accurate combined-decoration quote
Send the garment type, fabric weight and composition, garment colors, order quantity and wash or dye requirements. Provide separate print and embroidery files plus one placement view showing how the two layers relate.
- Finished width and height for each decoration layer
- Placement from measurable garment points
- Required overlap, contact or clearance
- Print colors, ink direction and hand-feel target
- Embroidery thread colors, stitch direction and backing expectation
- Garment sizes and color-specific artwork changes
- Panel or finished-garment application
- Required process order and sample approval stage
Use the tech pack guide to document the decoration map, the wash guide to identify finish-related risks and the clothing sample process to control the combined approval before bulk.